For anyone who wants to know the weight of the fuselage MINUS the wheel assembly, all of it bolted and the wood insers in place, I ma speaking of plans up to drawing three, I weighed it on my calibrated scales as 69 lbs. This should be a good place to work from, I have not included the tail wheel, seats, floor boarding or anything except what you see on drawing three of the plans. (And built in strict accordance to the plans.)
-Roy
Showing posts with label affordaplane. Show all posts
Showing posts with label affordaplane. Show all posts
Wednesday, January 11, 2012


Monday, December 5, 2011
Affordaplane Crash Report: Terry Warren
The second one was Terry Warren. His aircraft is the second picture down on the
group homepage (His photo is no longer posted on the group homepage). He stalled
from about 50 feet up, pancaked onto the runway squashing the entire fuselage.
Once again... pilot error, aircraft totaled, and the pilot unhurt.
group homepage (His photo is no longer posted on the group homepage). He stalled
from about 50 feet up, pancaked onto the runway squashing the entire fuselage.
Once again... pilot error, aircraft totaled, and the pilot unhurt.
Affordaplane Crash Report: Larry Hrometz
Well, now I'll report on Affordaplane accident #3. Again... Pilot error,
aircraft totaled, pilot unhurt.
Larry Hrometz, the pilot, asked me to share details with the groups so that
hopefully we can all learn from his accident. I will create a PHOTO folder of
the accident photo's that I took.
http://groups.yahoo.com/group/Cheapaircraft/photos/album/592839947/pic/list


[there are more pictures on the yahoo group]
The series of events that led up to last evenings accident (7-16-09) actually
started last fall.
He finished the aircraft and took it to a local airstrip for initial testing
(not the airport where last nights accident happened). Taxi tests went well, and
he started making short crow-hops. He was having an issue with the aircraft
wanting to veer to the left. He ended up nipping a wingtip on a tree. Only very
minor damage to the wingtip. He discovered that a brake was mis-adjusted causing
it to drag. He trailered the aircraft home for the winter and to make repairs.
This past spring, he brought the aircraft to my local strip, Barber Airport
(2D1). I helped him assemble the aircraft and, at his request, performed as
thorough a pre-flight as I am capable of.
The only issue I found was that the rudder was capable of hitting the elevator.
He showed me that full rudder input placed the rudder about one inch shy of the
elevator, but I noted that while he was holding full rudder, I could move the
rudder until it contacted the the elevator.
Since full rudder input kept the the rudder away from the elevator, we decided
that all should be fine until he can install rudder stops. Neither one of us
realized what was actually happening.
Again he started taxi testing, progressing to short crow hops. About a month ago
(I don't remember the exact date) he was headed north on the N-S runway, about 5
feet up at about 50 mph, when the aircraft started veering to the right. He
started gentile left rudder inputs and the aircraft continued moving to the
right. Realizing that the aircraft was in trouble and heading off of the runway,
he chopped the throttle and tried to ease the plane back to the ground. The
right main caught a berm off the east side of the runway, causing the aircraft
to start into a groundloop. Unfortunately, right where the groundloop started is
a pond just off the runway edge. The aircraft ended up in the water, standing on
it's nose, tail straight up in the air.
I wasn't able to get to the airport after the accident, so I have no photo's.
The only damage to the aircraft was a slightly bent cabane, a broken prop, and a
badly brused ego.
Post accident analysis led back to the issue with the rudder. During initial
construction, he decided to use a rudder bar instead of pedals. The proper
installation of a rudder bar relies on rudder cable tension not return springs
to maintain the proper cable tension. When he fabricated the rudder horn, he
placed it so the cable attach points were behind the rudder hinge line. This
allowed the left cable to go slack when right rudder was applied, and vice
versa.
So, when he was trying to ease in left rudder, he never actually got to the
point where the cables got tight enough to actually turn the aircraft. Trying to
ease in left rudder never got past the slack cable. We both learned something.
We knew something wasn't correct, but didn't identify exactly what it was.
Believe me I felt as bad as he did. We should have caught it !!!
He corrected the rudder geometry problem and installed a new prop. Now the
rudder cables stay tight all the time.
Yesterday afternoon I stopped at the airport. It was too windy to fly, so he was
cleaning the plane. We chatted for a while. He started telling me about
performing a static thrust pull test. He said he got 108 to 110 pounds of pull
at 4000 rpm. I told him that the aircraft would not fly on that small amount of
thrust, and that the rpm's were too high. It has a 1/2 VW, about 28 hp, and was
turning a 54-26 prop. The first prop was a 54-24. I felt that he needed more
prop in order to get the static rp's down to around 3400. He said the aircraft
performed the crow hops just fine. Again I missed something that I wouldn't
realize until later. We chatted a while longer and I went home.
The owner of the airstrip called me at 8:30 pm telling me that Larry crashed, he
was fine, but it was bad. I rushed to the accident scene.
As you will see in the photo's, I found the aircraft sitting nose up against a
truck camper, badly mangled. After the Ohio Highway Patrol and the local
Sherriff completed their investigation, and the FAA released the aircraft from
the scene (saying that the aircraft was a Ultralight so no formal investigation
was necessary), we loaded it onto a hay wagon and hauled the plane back to the
airport.
The details are...
The wind had settled down, so he decided to do some more crow hops. He was up a
few feet higher than normal, heading south on the N-S runway. He lost track of
where he was on the runway and realized he didn't have enough runway to set
down, so he applied full throttle and decided to just fly it around the pattern.
After a few seconds of climbing, the aircraft settled and stopped climbing. He
managed to make about 40-50 ft altitude. There were wires and trees directly in
front of him. He knew he couldn't clear either of then so he initiated a right
turn.
He lost airspeed in the turn and the aircraft started into a classic stall-spin
condition. He clipped the top of a power pole (visible in one of the photo's)
with the left main (this probably saved his life) spinning him down to the
right. He caught a wingtip on the edge of the house, reversing the spin but
slamming him nose first into the truck camper. He bounced back and dropped. The
photo's show it all.
The bottom line is that the engine didn't develope enough thrust to fly, bu DID
allow the aircraft to fly "In Ground Effect". Yikes... that's what I didn't
catch... ground effect... just didn't put 2 and 2 together.
Larry is sore as hell today, but he is alive and is already planning to build
again, but this time with a full VW.
The aircraft actually did very well in the crash. He had welded all of the
joints instead of bolts and gussets. Not one weld failed !!! Lots of bent and
mangled bolts and fittings. Everybody who looked at the wreckage said that it
has a very strong basic airframe.
I spent 2-1/2 hours helping him disassemble and pack the aircraft back in his
trailer.
So, what can we learn from all this?? This is exactly why it is called
EXPERIMENTAL aviation. Never take anything for granted. Check, double check,
triple check, and if something don't seem right... it probably isn't.
If I missed anything, just ask...
"An update to the following information. Larry has since purchased a Quicksilver
(Tweety Bird) which he has logged alot of hours, and a Taylorcraft project, and
has started toward his Sport Pilot license. He is currently helping a local
builder repair a homebuilt biplane that was damaged during a forced landing."
aircraft totaled, pilot unhurt.
Larry Hrometz, the pilot, asked me to share details with the groups so that
hopefully we can all learn from his accident. I will create a PHOTO folder of
the accident photo's that I took.
http://groups.yahoo.com/group/Cheapaircraft/photos/album/592839947/pic/list


[there are more pictures on the yahoo group]
The series of events that led up to last evenings accident (7-16-09) actually
started last fall.
He finished the aircraft and took it to a local airstrip for initial testing
(not the airport where last nights accident happened). Taxi tests went well, and
he started making short crow-hops. He was having an issue with the aircraft
wanting to veer to the left. He ended up nipping a wingtip on a tree. Only very
minor damage to the wingtip. He discovered that a brake was mis-adjusted causing
it to drag. He trailered the aircraft home for the winter and to make repairs.
This past spring, he brought the aircraft to my local strip, Barber Airport
(2D1). I helped him assemble the aircraft and, at his request, performed as
thorough a pre-flight as I am capable of.
The only issue I found was that the rudder was capable of hitting the elevator.
He showed me that full rudder input placed the rudder about one inch shy of the
elevator, but I noted that while he was holding full rudder, I could move the
rudder until it contacted the the elevator.
Since full rudder input kept the the rudder away from the elevator, we decided
that all should be fine until he can install rudder stops. Neither one of us
realized what was actually happening.
Again he started taxi testing, progressing to short crow hops. About a month ago
(I don't remember the exact date) he was headed north on the N-S runway, about 5
feet up at about 50 mph, when the aircraft started veering to the right. He
started gentile left rudder inputs and the aircraft continued moving to the
right. Realizing that the aircraft was in trouble and heading off of the runway,
he chopped the throttle and tried to ease the plane back to the ground. The
right main caught a berm off the east side of the runway, causing the aircraft
to start into a groundloop. Unfortunately, right where the groundloop started is
a pond just off the runway edge. The aircraft ended up in the water, standing on
it's nose, tail straight up in the air.
I wasn't able to get to the airport after the accident, so I have no photo's.
The only damage to the aircraft was a slightly bent cabane, a broken prop, and a
badly brused ego.
Post accident analysis led back to the issue with the rudder. During initial
construction, he decided to use a rudder bar instead of pedals. The proper
installation of a rudder bar relies on rudder cable tension not return springs
to maintain the proper cable tension. When he fabricated the rudder horn, he
placed it so the cable attach points were behind the rudder hinge line. This
allowed the left cable to go slack when right rudder was applied, and vice
versa.
So, when he was trying to ease in left rudder, he never actually got to the
point where the cables got tight enough to actually turn the aircraft. Trying to
ease in left rudder never got past the slack cable. We both learned something.
We knew something wasn't correct, but didn't identify exactly what it was.
Believe me I felt as bad as he did. We should have caught it !!!
He corrected the rudder geometry problem and installed a new prop. Now the
rudder cables stay tight all the time.
Yesterday afternoon I stopped at the airport. It was too windy to fly, so he was
cleaning the plane. We chatted for a while. He started telling me about
performing a static thrust pull test. He said he got 108 to 110 pounds of pull
at 4000 rpm. I told him that the aircraft would not fly on that small amount of
thrust, and that the rpm's were too high. It has a 1/2 VW, about 28 hp, and was
turning a 54-26 prop. The first prop was a 54-24. I felt that he needed more
prop in order to get the static rp's down to around 3400. He said the aircraft
performed the crow hops just fine. Again I missed something that I wouldn't
realize until later. We chatted a while longer and I went home.
The owner of the airstrip called me at 8:30 pm telling me that Larry crashed, he
was fine, but it was bad. I rushed to the accident scene.
As you will see in the photo's, I found the aircraft sitting nose up against a
truck camper, badly mangled. After the Ohio Highway Patrol and the local
Sherriff completed their investigation, and the FAA released the aircraft from
the scene (saying that the aircraft was a Ultralight so no formal investigation
was necessary), we loaded it onto a hay wagon and hauled the plane back to the
airport.
The details are...
The wind had settled down, so he decided to do some more crow hops. He was up a
few feet higher than normal, heading south on the N-S runway. He lost track of
where he was on the runway and realized he didn't have enough runway to set
down, so he applied full throttle and decided to just fly it around the pattern.
After a few seconds of climbing, the aircraft settled and stopped climbing. He
managed to make about 40-50 ft altitude. There were wires and trees directly in
front of him. He knew he couldn't clear either of then so he initiated a right
turn.
He lost airspeed in the turn and the aircraft started into a classic stall-spin
condition. He clipped the top of a power pole (visible in one of the photo's)
with the left main (this probably saved his life) spinning him down to the
right. He caught a wingtip on the edge of the house, reversing the spin but
slamming him nose first into the truck camper. He bounced back and dropped. The
photo's show it all.
The bottom line is that the engine didn't develope enough thrust to fly, bu DID
allow the aircraft to fly "In Ground Effect". Yikes... that's what I didn't
catch... ground effect... just didn't put 2 and 2 together.
Larry is sore as hell today, but he is alive and is already planning to build
again, but this time with a full VW.
The aircraft actually did very well in the crash. He had welded all of the
joints instead of bolts and gussets. Not one weld failed !!! Lots of bent and
mangled bolts and fittings. Everybody who looked at the wreckage said that it
has a very strong basic airframe.
I spent 2-1/2 hours helping him disassemble and pack the aircraft back in his
trailer.
So, what can we learn from all this?? This is exactly why it is called
EXPERIMENTAL aviation. Never take anything for granted. Check, double check,
triple check, and if something don't seem right... it probably isn't.
If I missed anything, just ask...
"An update to the following information. Larry has since purchased a Quicksilver
(Tweety Bird) which he has logged alot of hours, and a Taylorcraft project, and
has started toward his Sport Pilot license. He is currently helping a local
builder repair a homebuilt biplane that was damaged during a forced landing."
Affordaplane Crash Report: Mike Robbins
Reposted from the A-Plane Mailing List:
The first Affordaplane accident that I know of was Mike Robbins. The details of
his accident are posted in the main group archives (See text of this post #3452
following). If someone wants to take the time to look it up and post a link to
the message, I would appreciate it. It was pilot error, the aircraft was
totaled, and the pilot was unhurt.
The following is the post from Mike Robbins (no longer on the group)
The "He-Man" bars he mentions are the ones that are noted in the updates located
in the FILES area (I prefer to call them cabanes)...
No the plane is no longer flying.
I changed engines and while doing hops down the runway to test the radiator size
I accidentally took off. Not wanting to commit to free flight with an unproven
cooling system I forced the plane to land.
Well it didn't like the way that I did it and I wound up in a PIO that
eventually led to me applying full power right near stall speed. The torque
pulled me sideways and my left wing stalled, then I started to bounce down the
runway sideways with bigger and bigger bounces until my fuselage broke. It took
about 4 hits sideways to break it.
Right around the time the main tube under the seat broke, my gear broke. If I
had had the He-Man bars my fuselage would still be intact, Dave fixed this by
updating his plans.
The first Affordaplane accident that I know of was Mike Robbins. The details of
his accident are posted in the main group archives (See text of this post #3452
following). If someone wants to take the time to look it up and post a link to
the message, I would appreciate it. It was pilot error, the aircraft was
totaled, and the pilot was unhurt.
The following is the post from Mike Robbins (no longer on the group)
The "He-Man" bars he mentions are the ones that are noted in the updates located
in the FILES area (I prefer to call them cabanes)...
No the plane is no longer flying.
I changed engines and while doing hops down the runway to test the radiator size
I accidentally took off. Not wanting to commit to free flight with an unproven
cooling system I forced the plane to land.
Well it didn't like the way that I did it and I wound up in a PIO that
eventually led to me applying full power right near stall speed. The torque
pulled me sideways and my left wing stalled, then I started to bounce down the
runway sideways with bigger and bigger bounces until my fuselage broke. It took
about 4 hits sideways to break it.
Right around the time the main tube under the seat broke, my gear broke. If I
had had the He-Man bars my fuselage would still be intact, Dave fixed this by
updating his plans.
Tuesday, November 29, 2011
Video: Tim W's affordaplane.
On Turkey day I went and saw Tim W's plane. I also took a little video. I was at the wrong end of the field, but he did get the plane airborne a couple times. It was a little windy, so I don't blame him for not flying the pattern. Enjoy!
Click here: Tim's Affordaplane
Click here: Tim's Affordaplane
Sunday, November 27, 2011
Wing Building: Roger is at it again - How he makes aluminum ribs.
Well Roger did it again. He went ahead and detailed how he built the aluminum ribs for his plane. The process seems very similar to how the hummelbird people do it, and given the success of that plane, that's nothing but a compliment.
I'll annotate the pictures he posted, but here's his letter to the group:
"I'm back by request of one or two interested people on how I made my wing ribs. I posted a few photos again on cheapaircraft2 - Rogers (Kenneth formally Jims)photos.
It really is easy to make them this way. They are attached with rivits. That part goes fast. I put a wide cap strip on either end. To cut them out, You lock the piece up between the forms with bolts, The thin one on top to hold it down tight and the thick one on the bottom to guide the router. You need to make sure the bolt head on the top is flush or below the surface of the jig so the router can pass over it without dragging. I used toilet flange bolts because they have a flat head.
For the holes, you simply plunge the bit through the middle of the hole some where and cut it out fast and easy. Then cut around the outside. In less than a minute it is done. It takes more time to put it in the form than to cut it by far.
Next you lock it in the bending form and tap it over with a mallet. remember to make half each direction. The outside ribs do not have the lighting holes cut out. When you take them out of the form they will bend because of the curve of the air foil. You will have to flute them about every 2 inches to straighten them. I made a fluting tool out of a pair of vice gripes with a rod welded in the middle of one jaw and two on the outsides of the other by passing outside of the other to bend the aluminum to a controlled amount by adjusting the vice gripe closing screw. You then have to flange the holes to stiffen them. that is also quick with the home made flangers. With that you are finished. If your bit is sharp and cutting well which is normally not a problem, you will not even need to deburr the edges.
I made the aileron ribs the same way. It was quick and easy also. If this doesn't make sense shoot me a message and I will try to explain it better.
Warning, do not try to cut more that one at a time or you will have that many pieces welded together. I speak from experience.
Good luck and keep building. Roger."
How about lets follow along in pictures. First, he made his ribs from aluminum flashing from the hardware store. It typically comes in a 2' by 50' roll.
Step one is to make some cutting guides. You should make four without holes in them for the end ribs.

 You can see the bolt holes in them, that you use for locking the aluminum in between the cutting guides. After you cut out each rib, you'll then need to fold the edges over. This provides a wide attachment point for the fabric, and prevents a sharp aluminum edge from slicing open your wing from the inside. These forms get banged on quite heavily, so they're made of much thicker material than the cutting guides. You'll want to make sure you make "left" and "right" sided ones. Which you decide is which doesn't matter, so long as you mirror the left and right sides.

 Now the bit you folded over is longer than the outer surface of the airfoil. Which means you now have a pleasantly pringle shaped rib. On some planes they have cuts in the flange to do this, But seeing how those lead to more sharp edges I think the following method is better.
To straighten them out, you'll need to crimp, or flute, the flange you folded over. The flutes will take up the excess metal, without leaving sharp edges. An easy way to make a fluting tool, is to weld two pieces of welding wire to the top jaw of a pair of vice grips, then weld a single wire to the bottom jaw. It will take you a few attempts, but you should be able to figure out a pattern which leaves you with a very, very straight rib.
Also to improve the stiffness of the ribs, the cutout holes should also be flanged. That's best done using some blocks of wood that have been routed out. These are then pressed together over the opening in the ribs. Here's a couple pictures of the tooling that Roger made:


And here's a grandkid using the tooling:
 Isn't it nice to call it tooling? It sounds so professional.
He also used the same techniques to build his ailerons.


Not bad eh?
I'll annotate the pictures he posted, but here's his letter to the group:
"I'm back by request of one or two interested people on how I made my wing ribs. I posted a few photos again on cheapaircraft2 - Rogers (Kenneth formally Jims)photos.
It really is easy to make them this way. They are attached with rivits. That part goes fast. I put a wide cap strip on either end. To cut them out, You lock the piece up between the forms with bolts, The thin one on top to hold it down tight and the thick one on the bottom to guide the router. You need to make sure the bolt head on the top is flush or below the surface of the jig so the router can pass over it without dragging. I used toilet flange bolts because they have a flat head.
For the holes, you simply plunge the bit through the middle of the hole some where and cut it out fast and easy. Then cut around the outside. In less than a minute it is done. It takes more time to put it in the form than to cut it by far.
Next you lock it in the bending form and tap it over with a mallet. remember to make half each direction. The outside ribs do not have the lighting holes cut out. When you take them out of the form they will bend because of the curve of the air foil. You will have to flute them about every 2 inches to straighten them. I made a fluting tool out of a pair of vice gripes with a rod welded in the middle of one jaw and two on the outsides of the other by passing outside of the other to bend the aluminum to a controlled amount by adjusting the vice gripe closing screw. You then have to flange the holes to stiffen them. that is also quick with the home made flangers. With that you are finished. If your bit is sharp and cutting well which is normally not a problem, you will not even need to deburr the edges.
I made the aileron ribs the same way. It was quick and easy also. If this doesn't make sense shoot me a message and I will try to explain it better.
Warning, do not try to cut more that one at a time or you will have that many pieces welded together. I speak from experience.
Good luck and keep building. Roger."
How about lets follow along in pictures. First, he made his ribs from aluminum flashing from the hardware store. It typically comes in a 2' by 50' roll.
Step one is to make some cutting guides. You should make four without holes in them for the end ribs.


To straighten them out, you'll need to crimp, or flute, the flange you folded over. The flutes will take up the excess metal, without leaving sharp edges. An easy way to make a fluting tool, is to weld two pieces of welding wire to the top jaw of a pair of vice grips, then weld a single wire to the bottom jaw. It will take you a few attempts, but you should be able to figure out a pattern which leaves you with a very, very straight rib.
Also to improve the stiffness of the ribs, the cutout holes should also be flanged. That's best done using some blocks of wood that have been routed out. These are then pressed together over the opening in the ribs. Here's a couple pictures of the tooling that Roger made:


And here's a grandkid using the tooling:

He also used the same techniques to build his ailerons.


Not bad eh?
Thursday, November 24, 2011
Tim W's Affordaplane.
Hey everyone, this morning I visited Tim W at the airfield. The weather concerned me on the way out. It was a little windy, a bit hazy, and the clouds were quite low. When I got to the airfield, he took me on a tour of his plane, and the build decisions he made.
 Welcome to my first impression of the airfield... :-) Poor plane.
My first impression of Tim's plane however, was very good, and it stayed that way. His modification list is quite extensive. The winds were a bit high, so Tim kept his flying to a couple of quick runs down the runway.
Performance wise, with his MZ201 powered Affordaplane, is a mixed bag. The planes level maximum airspeed is in the 65mph range. However the climb performance is disappointing.
 Hi Tims plane.
So, what all did tim do? He tried to make the plane easily disassembled. He did something similar to Gent's tail, where the horizontal stablizer can fold. ... except the control horns interfere with the rudder. On the bright side, having a hinge means you can use the pins as a quick removal tool. The main and TE spar are also held on with pins.
 The tail originally just had single bracing wires, but Tim saw the leading edge dancing during flight, and he decided they needed some more bracing. While we're on the subject of flying surfaces, he also sealed the elevator and alerion gaps.

I really liked the landing gear. It's fiberglass rod, and beyond providing some shock absorption they are lighter than the per plans landing gear. They also fail progressively on a hard landing. (Tim's turning out to be a good test pilot.) Due to the way they are attached, they are easily replaced.
 While we're looking at Tim's planes legs, I'll note that he did not use the solid aluminum round bar to transfer strut load from one side of the plane to the other. He used some flat 2024 plate. You can also see he doubled up the bottom tube. The stock gear were hard enough on the frame to bend it.
The MZ201 he's running is the planes second engine. It was originally on a Kawasaki with a reduction drive. His engine mount is 2" longer than per plans. Despite that, he has 20oz of lead on the tailskid.

I like the prop.

He also ran all cables for the control surfaces. I'm not sure I'd make the same choice, but I have the whole r/c plane thing going for me. But look at those beautiful belcranks. The cables also facilitated the folding tail.

Thank you Tim for letting me look at, and show off your plane.

My first impression of Tim's plane however, was very good, and it stayed that way. His modification list is quite extensive. The winds were a bit high, so Tim kept his flying to a couple of quick runs down the runway.
Performance wise, with his MZ201 powered Affordaplane, is a mixed bag. The planes level maximum airspeed is in the 65mph range. However the climb performance is disappointing.

So, what all did tim do? He tried to make the plane easily disassembled. He did something similar to Gent's tail, where the horizontal stablizer can fold. ... except the control horns interfere with the rudder. On the bright side, having a hinge means you can use the pins as a quick removal tool. The main and TE spar are also held on with pins.


I really liked the landing gear. It's fiberglass rod, and beyond providing some shock absorption they are lighter than the per plans landing gear. They also fail progressively on a hard landing. (Tim's turning out to be a good test pilot.) Due to the way they are attached, they are easily replaced.

The MZ201 he's running is the planes second engine. It was originally on a Kawasaki with a reduction drive. His engine mount is 2" longer than per plans. Despite that, he has 20oz of lead on the tailskid.

I like the prop.

He also ran all cables for the control surfaces. I'm not sure I'd make the same choice, but I have the whole r/c plane thing going for me. But look at those beautiful belcranks. The cables also facilitated the folding tail.

Thank you Tim for letting me look at, and show off your plane.
Tuesday, November 22, 2011
Rogers Affordaplane
Roger completed his plane in the last few days. He built a fiberglass fuel tank, that fits in place of the wing seal. He also made his using aluminum ribs.
He tells the story best, Roger wrote:
"I made quite a few changes to the plane and did not
want to talk about them until the thing flew. It will now be until spring
because of the cold weather. Some of the things I changed are; gap seal fuel
tank, droop tip wings, wing ribs made from sheat aluminum, US 35b wing foil. I
uses a 400cc polaris snowmobile engine which should put out about 40 hp as
arranged. I also made my own prop with ptips. It pulls very well. It weighed in
an 72 lbs. Many of the changes I made did reduce the weight. The finished wings
without droop tips weighted 27.5 lbs the tips were about 4.5 lbs each. The gap
seal tank serves two purposes of tank and most of the gap seal. I also went with
Y struts to make it easier to get in and out. I will try to post pictures when I
can figure out how to do that. There are some pictures on cheapaircraft 2 under
kenneths and under Rogers. They were posted by my son. I put it in our county
fair in Aug. and won a sweepstakes with it. I also took it to our local flyin
and did a bit of taxi work. It handled better than I had expected on the ground.
I also got a little experience in a two seater but it was a trike gear. I need
tail dragger experience and that a a bit harder to come up with here. I do not
know the final weight but I believe it will be under 300. I learned a few things
along the way like fiberglass tanks do not hold up to ethanol fuel. I had to
coat the inside of the tank. I would like to find plain gas but can't find any
here locally. I spent less than $2,500 out of pocket but I am a really good
scrounger. If you want any more information please contact me direct and I can
give you more info. Keep building. Roger"
"I was very careful to check out weights of all the changes I made
and everyone except putting very large tires on were under or at the weight that
the plans would have been. and the wheels were lighter than wheel borrow so that
would have been close to a wash. I wanted large tires to make up for no
suppension. The sheet aluminum ribs were almost half the weight of doing the
foam ones. I made one out of foam to compare. It took me about 20 minutes per
rib to make them but the time is in making the jigs. once set up they are almost
fun to make and turn out exactly the same every time"


That's a darned good looking plane. I can't wait till spring when we can get some flight reports about it!
Some new information from the horses mouth:
"I do not know the weight of everyone elses wing, but mine did come in with fabric and paint at 27.5 and 27.8. One wing was a bit heavier because I ran out of 1.8 ounce fabric and finished that wing with a bit of 2.7 ounce cloth which I had on hand. I did install droop tips which weighed about 4.5 lbs each The material is siding coil which comes in 2' x 50' rolls."
He tells the story best, Roger wrote:
"I made quite a few changes to the plane and did not
want to talk about them until the thing flew. It will now be until spring
because of the cold weather. Some of the things I changed are; gap seal fuel
tank, droop tip wings, wing ribs made from sheat aluminum, US 35b wing foil. I
uses a 400cc polaris snowmobile engine which should put out about 40 hp as
arranged. I also made my own prop with ptips. It pulls very well. It weighed in
an 72 lbs. Many of the changes I made did reduce the weight. The finished wings
without droop tips weighted 27.5 lbs the tips were about 4.5 lbs each. The gap
seal tank serves two purposes of tank and most of the gap seal. I also went with
Y struts to make it easier to get in and out. I will try to post pictures when I
can figure out how to do that. There are some pictures on cheapaircraft 2 under
kenneths and under Rogers. They were posted by my son. I put it in our county
fair in Aug. and won a sweepstakes with it. I also took it to our local flyin
and did a bit of taxi work. It handled better than I had expected on the ground.
I also got a little experience in a two seater but it was a trike gear. I need
tail dragger experience and that a a bit harder to come up with here. I do not
know the final weight but I believe it will be under 300. I learned a few things
along the way like fiberglass tanks do not hold up to ethanol fuel. I had to
coat the inside of the tank. I would like to find plain gas but can't find any
here locally. I spent less than $2,500 out of pocket but I am a really good
scrounger. If you want any more information please contact me direct and I can
give you more info. Keep building. Roger"
"I was very careful to check out weights of all the changes I made
and everyone except putting very large tires on were under or at the weight that
the plans would have been. and the wheels were lighter than wheel borrow so that
would have been close to a wash. I wanted large tires to make up for no
suppension. The sheet aluminum ribs were almost half the weight of doing the
foam ones. I made one out of foam to compare. It took me about 20 minutes per
rib to make them but the time is in making the jigs. once set up they are almost
fun to make and turn out exactly the same every time"


That's a darned good looking plane. I can't wait till spring when we can get some flight reports about it!
Some new information from the horses mouth:
"I do not know the weight of everyone elses wing, but mine did come in with fabric and paint at 27.5 and 27.8. One wing was a bit heavier because I ran out of 1.8 ounce fabric and finished that wing with a bit of 2.7 ounce cloth which I had on hand. I did install droop tips which weighed about 4.5 lbs each The material is siding coil which comes in 2' x 50' rolls."
Not part 103? Well we can fix that.
So, the affordaplane really isn't a part 103 legal airplane.
At least as per the plans. However, there is some hope. The idea is good. The concept is solid. So lets make it legal.
Dan L suggested we swap to .75" tubing on the tailplane. We'll need to do the math to determine if it will support the aerodynamic loads. He suggests there's an 8lb savings to be found there.
I recommended the replacement of the tail tubing, windshield post tubing, and lower motor mount tubing with 2"x.0.0625 wall tubing. I think there's 19lbs to be saved using that technique. Math will need to be done to determine if the tail will have sufficient torsional rigidity.
The cross bracing on the tail should be .75diameter and you can go with much thinner wall tubing. There's 1.6lbs to be saved there, if you retain the same wall thickness.
I suggested that by going to V wing support struts, you can eliminate one 1" aluminum bar, and save two pounds. and the front strut, if bolted in properly, could have it's center 1' removed. Saving three pounds total.
The landing gear as designed leaves a lot to be desired. We'll need to discuss the replacemnet options. Gent has a 30lb bent aluminum plate as his. The texas parasol landing gear are lighter, and provide suspension as well.
At least as per the plans. However, there is some hope. The idea is good. The concept is solid. So lets make it legal.
Dan L suggested we swap to .75" tubing on the tailplane. We'll need to do the math to determine if it will support the aerodynamic loads. He suggests there's an 8lb savings to be found there.
I recommended the replacement of the tail tubing, windshield post tubing, and lower motor mount tubing with 2"x.0.0625 wall tubing. I think there's 19lbs to be saved using that technique. Math will need to be done to determine if the tail will have sufficient torsional rigidity.
The cross bracing on the tail should be .75diameter and you can go with much thinner wall tubing. There's 1.6lbs to be saved there, if you retain the same wall thickness.
I suggested that by going to V wing support struts, you can eliminate one 1" aluminum bar, and save two pounds. and the front strut, if bolted in properly, could have it's center 1' removed. Saving three pounds total.
The landing gear as designed leaves a lot to be desired. We'll need to discuss the replacemnet options. Gent has a 30lb bent aluminum plate as his. The texas parasol landing gear are lighter, and provide suspension as well.
Wednesday, November 9, 2011
Built and flying Affordaplanes
So, here's an incomplete list of who's flying Affordaplanes.
1. The original.
2. Gents big silver affordaplane
1. The original.
2. Gents big silver affordaplane
Gent's big silver affordaplane.
Straight from Gent.
"Some specifics on my plane, it still doesn't have a name, N840XP
reserved:
Empty weight: 425 lb
Fuel capacity: 5 gal total in wing tanks on the CG
Engine: 4A084 military, 40+ hp
Prop: modified from a 60x24 to 56x22ish Cloudcars wood hoerner tips
Airfoil: true ClarkY as replotted by Dan to fit the Chord
Wingspan: clipped from the plans to 26' 8" with Hoerner tips
Dihedral: 2 degrees
Spars: front, 2"x.058 sleaved full length with 1 7/8"x.058
rear, 1 1/2"x.058 also sleaved full length 1 3/8"x.058
Ailerons: 7ish inch chord 1 1/4x.058 LE spar Mike Robbins inspired
"easy ailerons" with the piper TE
Struts: Carlson streamlined, large front and small rear with
Carlson streamlined jurys in a Y configuration
Strut attach/carry thru: 1" square 2024 t3
If you want more detail ask specific questions LOL!"
And how about a picture or two?


And here's a link to his youtube videos.
Gent's youtube videos.
"Some specifics on my plane, it still doesn't have a name, N840XP
reserved:
Empty weight: 425 lb
Fuel capacity: 5 gal total in wing tanks on the CG
Engine: 4A084 military, 40+ hp
Prop: modified from a 60x24 to 56x22ish Cloudcars wood hoerner tips
Airfoil: true ClarkY as replotted by Dan to fit the Chord
Wingspan: clipped from the plans to 26' 8" with Hoerner tips
Dihedral: 2 degrees
Spars: front, 2"x.058 sleaved full length with 1 7/8"x.058
rear, 1 1/2"x.058 also sleaved full length 1 3/8"x.058
Ailerons: 7ish inch chord 1 1/4x.058 LE spar Mike Robbins inspired
"easy ailerons" with the piper TE
Struts: Carlson streamlined, large front and small rear with
Carlson streamlined jurys in a Y configuration
Strut attach/carry thru: 1" square 2024 t3
If you want more detail ask specific questions LOL!"
And how about a picture or two?


And here's a link to his youtube videos.
Gent's youtube videos.
Affordaplane weights.
The plans state that an affordaplane weighs 254lbs. That's the "rule" weight. Something seems rather fishy about that. Turns out.. it's as fishy as it sounds. Here's a list of completed Affordaplane weights:
Original Prototype: 265lbs
With Rotax 277
Gents A-Plane: 425lbs
His is 084 powered. That alone is a 125lb powerplant.
Mike R's A-Plane: 310lbs
With Rotax 447
Todds A-Plane: 426lbs
With Rotax 503
Todd B A-plane: 324lbs
aplanebuilder A-plane: 320lbs
With efforts to lighten it.
danl239: over 456lbs
Not built to plans.
356lbs without engine.
Please, if you have built one, tell me what yours weighs. Lets get you in as part of the database!
The word is, that with some work, and lots of work, the plane can be built under part 103 weight. That will be discussed in some of the modification posts.
Mailing list refrence: http://groups.yahoo.com/group/Cheapaircraft/messages/390
http://groups.yahoo.com/group/Cheapaircraft/message/4206?threaded=1&l=1
Original Prototype: 265lbs
With Rotax 277
Gents A-Plane: 425lbs
His is 084 powered. That alone is a 125lb powerplant.
Mike R's A-Plane: 310lbs
With Rotax 447
Todds A-Plane: 426lbs
With Rotax 503
Todd B A-plane: 324lbs
aplanebuilder A-plane: 320lbs
With efforts to lighten it.
danl239: over 456lbs
Not built to plans.
356lbs without engine.
Please, if you have built one, tell me what yours weighs. Lets get you in as part of the database!
The word is, that with some work, and lots of work, the plane can be built under part 103 weight. That will be discussed in some of the modification posts.
Mailing list refrence: http://groups.yahoo.com/group/Cheapaircraft/messages/390
http://groups.yahoo.com/group/Cheapaircraft/message/4206?threaded=1&l=1
Ongoing build projects:
Here's a list of ongoing build projects. If you want to see yours listed, send me a message. The more, the merrier!
outofthebox50 is building an enclosed Affordaplane. He's using C channel on the tail to save 6 pounds. Perhaps that will make up for the weight of covering! He has laid down metal, so it is not just talk.

outofthebox50 is building an enclosed Affordaplane. He's using C channel on the tail to save 6 pounds. Perhaps that will make up for the weight of covering! He has laid down metal, so it is not just talk.

So what about the Affordaplane?
So if you build an Affordaplane, what can you expect?
Who is building one? Well here's who is building them.
How many have been completed?
Do we have proof of them flying? Yes! Lots! In various configurations.
What will it weigh? This is what an affordaplane weighs.
What is the planes glide ratio, at what weight, and at what speed? Good questions!
What engine should I chose? Here's your options, and what they weigh, and how much power they make.
What defines the VNe?
What is the expected takeoff run?
What are the power on, and power off stall speeds?
Will the plane spin? How easily will it recover from a spin?
What sort of performance should one expect from a given power level?
Who is building one? Well here's who is building them.
How many have been completed?
Do we have proof of them flying? Yes! Lots! In various configurations.
What will it weigh? This is what an affordaplane weighs.
What is the planes glide ratio, at what weight, and at what speed? Good questions!
What engine should I chose? Here's your options, and what they weigh, and how much power they make.
What defines the VNe?
What is the expected takeoff run?
What are the power on, and power off stall speeds?
Will the plane spin? How easily will it recover from a spin?
What sort of performance should one expect from a given power level?
Questions the plans left open to interpretation.
I'll happily add anyone else's questions to this. The answers will be covered in later posts.
The plans never mention the weight of the prototype: What do these things really weigh?
The plans indicate the prototype used a Rotax 277 and that it was underpowered: What defines underpowered?

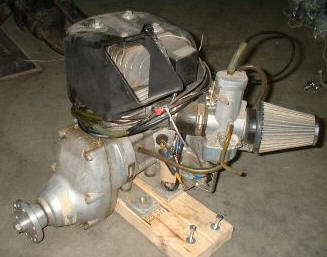
The plans indicate the Rotax 447 is the recommended motor, it weighs 82lbs. The plans state the motor weight budget is 80lbs: What is the real engine weight budget?

The plans don't have any indication of what the target weights are for components: What should each part weigh?
The plans never mention the weight of the prototype: What do these things really weigh?

The plans indicate the prototype used a Rotax 277 and that it was underpowered: What defines underpowered?
The plans indicate the Rotax 447 is the recommended motor, it weighs 82lbs. The plans state the motor weight budget is 80lbs: What is the real engine weight budget?

The plans don't have any indication of what the target weights are for components: What should each part weigh?
Getting the plans.
I ordered my plans from www.affordaplane.com.
They were delivered within minutes via e-mail. You have 48 hours to download the plans, and only three attempts. So... make sure your internet is working, and plan on where you're going to save the files.

Sure the going rate for the plans is $8 a set, but having to spend that money again to get another copy because your hard drive crashed is going to make you cranky.
They were delivered within minutes via e-mail. You have 48 hours to download the plans, and only three attempts. So... make sure your internet is working, and plan on where you're going to save the files.

Sure the going rate for the plans is $8 a set, but having to spend that money again to get another copy because your hard drive crashed is going to make you cranky.
it all begins here.
Really it all begins in the same place for all of us. That passion for flying. But that's not something I can help you with. We'll assume you know you want a small plane that looks like it could take a beating, or whatever else you might throw at it. That would very handily describe the subject of this database. The Affordaplane.
My involvement started where I found several mentions of it on a few forums, and a few clever videos of one on youtube. That was enough to convince me to buy plans.
From there.. I found a few snags. We'll cover one in each post. Along with individual planes, buld tips, statistics, crash reports, and hopefully a healthy dose of humor.
Welcome!
My involvement started where I found several mentions of it on a few forums, and a few clever videos of one on youtube. That was enough to convince me to buy plans.
From there.. I found a few snags. We'll cover one in each post. Along with individual planes, buld tips, statistics, crash reports, and hopefully a healthy dose of humor.
Welcome!
Subscribe to:
Posts (Atom)